 |
||||||||||||||||||||||||||||||||||||||||||
|
Formula one |
|
|||||||||||||||||||||||||||||||||||||||||
|
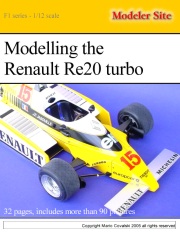
Detailing the Renault Re20 turbo: a guide for novices Tamiya 1/12 scale |
||||||||||||||||||||||||||||||||||||||||||
|
by Mario Covalski © Modeler Site |
||||||||||||||||||||||||||||||||||||||||||
|
Legal Notice No material from Modeler Site any Web site owned, operated, licensed, or controlled by Damian Covalski may be copied, reproduced, republished, uploaded, posted, transmitted, or distributed in any way, except that you may download one copy of the materials on any single computer for your personal, non-commercial home use only, provided you keep intact all copyright and other proprietary notices. Modification of the materials or use of the materials for any other purpose is a violation of Damian Covalski's copyright and other proprietary rights. Read More here > Legal notice During the 80’s decade Tamiya offered what was going to be their last kit in their superb collection of 1/12 F1 models, the car was the Renault Turbo RE20. After that, the modelers had to suffer a drought of 10 years, until we had the chance to see a new model in this very well known collection, the Ferrari 641/2, which was issued in 1991. This is my second attempt with this kit, the first was many years ago, and I only remember that it was “a little bit complicated”. So, I want to begin this note with three concepts which are: 1) this is a very complex kit (I will say why later), 2) objectives, and 3) planning.
When I say “objectives”, I am talking about what we aim at when we start a rather complex project; do we want a museum piece? an “out of the box”? or just something good with a reasonable amount of work?. These are the questions that I had to answer to myself when I decided to build the Renault; it is impossible to face a project like this without making an evaluation of what is it that we want, and how much effort and money is going to take; if we don’t think about these details, we can end with another “half built” kit in the box.
As for the planning, I think this is the key factor in the building of this model, if you don’t plan ahead very carefully on how to solve all the challenges that you will encounter, failure is around the corner… and I have learned that the painful way. As for the objective of this note, it will be to explain the solutions chosen in order to solve some of the key points for the success of this project, and the few extra parts and simple details that I used in order to enhance the final results. If you could assemble this model without painting, that is, taking parts from the sprues and gluing them as the instructions say, I am sure that in a single weekend, the model would be… rolling out. But we all know that this modelers dream can’t be true; however, if it is difficult is worth a lot, and believe me…this model is “really” difficult. Conflicts We must face several problems that need planning, before deciding the best way to go. Before going ahead, I would like to make a comment on how to deal with painted parts. To me, I prefer to assemble as much as possible, and then paint the assembly, even if you have to mask some parts of it. You have to evaluate what is more difficult, gluing parts or masking them for painting. But are some parts, like the chassis, that don’t take that kind of analysis, the whole structure must be glued before painting it. You can’t think on gluing body parts after the painting process, how would be erase the joint, and moreover, how would we have a strong joint in parts with little surface for the glue. It happens the same with the chassis, but things get worse because silver paint, no matter the brand, is more delicate than enamels and lacquers.
This special issue is only available in pdf format. This is a technical article of 32 pages, plus 120 large pictures... Learn more about this note > Here
Esta Nota es ofrecida en formato PDF, el cual puede ser leído o impreso usando el Acrobat reader, contacte a nuestro webmaster > Aquí Incluye más de 120 imágenes, aquí solo mostramos las paginas de texto.
|
||||||||||||||||||||||||||||||||||||||||||


