
By Geo Tziafas
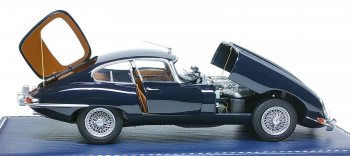
A true masterpiece, an automotive treasure that, when it was first unveiled six decades ago in 1960 at the Geneva Motor Show, prompted Enzo Ferrari to declare it the most beautiful car in the world, takes the spotlight in the following article. With over 70,000 units of the E-Type produced, it graced the Coventry factory floor in three distinct phases: Series 1 (1961-1968), Series 2 (1969-1971), and Series 3 (1971-1974).
COMMENTS
By Allon Kira
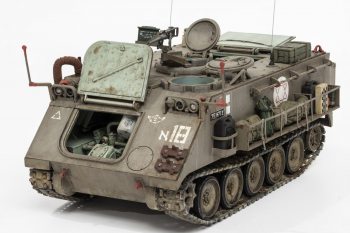
In the 1970s, the IDF equipped itself with a large amount of M-113 APCs, and since then they served in all of Israel's wars and operations, including the Yom Kippur War, Operation Peace for the Galilee, the First Intifada, the Second Intifada, the Second Lebanon War, Operation Cast Lead and Operation Protective Edge. This article goals to share with the reader the steps I followed to build a IDF M-113 Medivac from the Tamiya M-113 kit.
COMMENTS
By Edwing E. Merlo Paredes
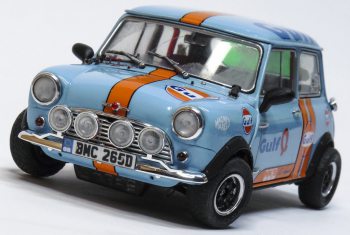
In this tutorial I’ve made a road vehicle version with own elements of a rally car, and decorated with the Gulf emblems and colors. The kit used to build this model is the Tamiya 1/24 that ran in Monte Carlo rally 1967 (#24048). It’s cheap and is being manufacturing from time to time and can be easily purchased in many online shops
COMMENTS
By Edwing E. Merlo Paredes
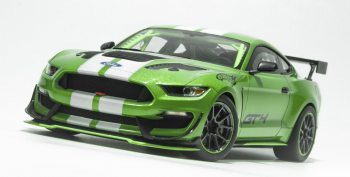
Basically this kit has been built straight out of the box, using almost all of the parts included in the kit, and small details such as generic photo-etched screw heads have been added. The objective of this tutorial is to share with the reader the steps that I followed to build this model.
COMMENTS

By Pablo Raggi
The M3 Scout Car(s) that Israel received from France and Italy together with the M2, M3, M5 and M9 half tracks in the early 50’s, would see service on several combats and also suffer many modifications.
COMMENTS


By Mario Covalski
With this photo array (one picture says more than thousand words sometimes) I share with the reader my experience with the model adding many missing details, not all, painting parts and applying plastic modelling techniques to improve the appearance of this expensive model. Also solving some problems that the kit has and showing tips and tricks to improve or facilitate its assembly.
COMMENTS
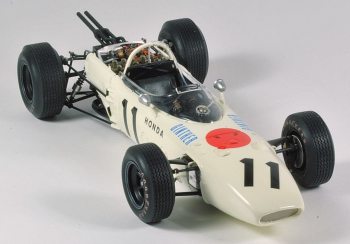
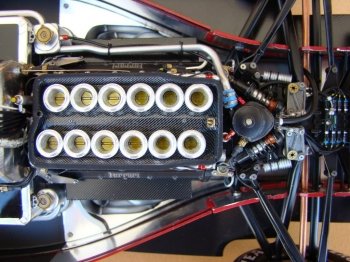
By Geo Tziafas
Starting a Hiro kit build is essentially starting a game of chess. Each move affects the next and the slightest mistake may cost in fitting or detailing issues. In addition, as in the famous board game, the more moves (test fits) you are ahead the better you can predict the way they will interact with each other and the less likely it is to be checkmated during the final assembly.
COMMENTS
By Mario Covalski
With this photo array I share with the reader my experience with the model adding many missing details, not all, painting parts and applying plastic modeling techniques to improve the appearance of this expensive model. In addition, solving some problems that the kit has and showing tips and tricks to improve or facilitate its assembly.
COMMENTS
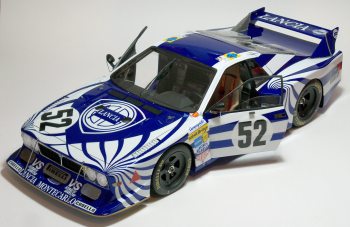
By Antonio Busciglio
The model nicely reproduces the shape of the car, but most of the details are missing, or oversimplified due to production and technology issues. On this basis, I decided to build this model adding as much detail as possible for my skills. As an additional difficulty, there are nearly no detail sets for this kit, so it would be necessary to add them from scratch. In particular, I used a large number of resin rivets and bolts, some turned bolts, leftover photoetched from my spare box and a lot of scratch-building. In this tutorial I’ll describe all the building process in detail. I hope you’ll enjoy building this model as I did.
COMMENTS
By Mario Covalski
This article will be useful to anybody who wants to pursue this project, I decided to write it in the form of an instruction manual, following the steps set forth in the Tamiya's instruction manual, but also indicating all modifications to be made in order to insert the "Perfect Parts" metal parts, along with suggestions and advice on my experience with this model on every stage of the construction.
All general recommendations on the use of CA and handling of metal and photoetched parts can be found in the previous articles.
COMMENTS

By Mario Covalski
This article aims at leading the reader through the assembly process of a Tamiya Datsun 240Z in 1/12 scale. On next pages, I’ll explain the different techniques I used for the construction of the models, and though some of them are obsolete, they’re still very useful for beginners. Although this article is focused to novices, I think that even will be useful for advanced modelers to take ideas and several recommendations, if they have not built this kit yet.
COMMENTS
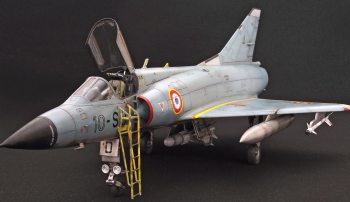
By Fabrice Marechal
When I was asked to build the Italeri Mirage, I was really excited. I had dreamed since long ago with building and representing the weathering using new technologies on an aircraft. As some friends know, I’m colorblind and never could realize about the colors of an aircraft weathering. I used to build a lot of 1/72 Matchbox kits (some military vehicles) as a child , sometimes painting them. Anyway, nothing to do with the new techniques and besides, since the age of twelve, I’ve not touched a military kit.
COMMENTS
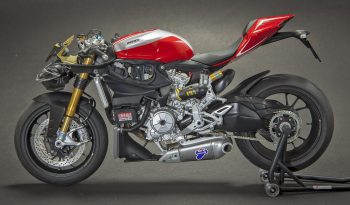
By Ricardo Gonzalez
The Ducatti Panigale is to my liking one of the most spectacular motorcycles of the past decade. Thanks to Tamiya we can have a model of it, both were the reasons why I decided to build it trying to get the most detailed model I could , taking advantage of the fact that as it was a mass production model, it would be possible for me to get a lot of references. Not only I built and superdetailed the model, but also made a slightly and own customized version, a real Panigale, as I would like to have. The aim of this article, is to show with pictures and their comments the work accomplished as a guide and to give ideas of the details that can be added or showing in some cases how to do the different tasks.
COMMENTS
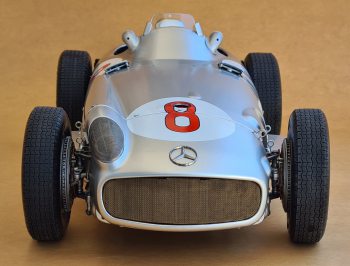
By Masa Narita
Building step by step….day by day. As soon as I looked inside this beautiful kit, I could not hold my horse. I had to stop other projects (1/35 Hetzer, 1/32 F-15J). I decided to build this kit straight from the box because I really wanted to see the completion as soon as possible. Also this time, I will update these pages while building the kit. So let's build this wonderful giant kit!!
COMMENTS
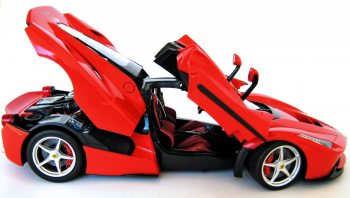
By Felice Ferriello
Tamiya offer an excellent model for Ferrari lovers, that can’t be missing in a collection. In my opinion, it’s a very complex kit so not recommended for novices or those who want to spend some time distracted and relaxed with a simple model. Its complexity obliges you to study very carefully the instructions preparing a building plan, altering the instruction steps to get a good result.
This article aims at sharing with the reader the work achieved during several months to superdetail this beautiful model, providing lots of images.
COMMENTS
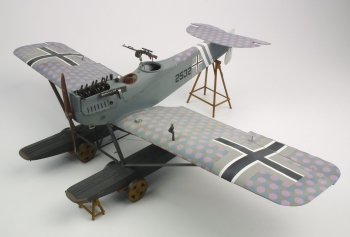
By Michael Capell
No sooner had I finished the Wingnut Wings Roland , than the Hansa Brandenberg out of its box, same day actually, and it is big. There is something about the Hansa that set it apart from other aircraft, even from a distance there is no mistaking it . Several other manufactures have produced it in smaller scales versions , but a combination of modern moulding techniques and Wingnuts reputation will set this one apart from the rest.
COMMENTS
By Edwing E. Merlo Paredes
Nowadays, There are not a great many 1/12 car model kits available. Perhaps, you may find some, from Doyusha, Fujimi, Tamiya, Monogram, Revell, around the Internet. From my point of view, the 1/12 scale has some disadvantages with respect to the 1/24 scale, these models size and the apace they take at the time of being displayed either in your house or at exhibitions; besides one must be extremely careful with the details, since they will be more visible.
COMMENTS

By Guy Golsteyn
I intended to build this Ducati almost “out of box”, meaning that I won't execute any sophisticated conversions or intensive super detailing. First of all this kit is already pretty good detailed, in spite of its age, and furthermore it's not a racebike, but a classic streetbike from the ‘80s that has never heard of carbon fiber or electronic devices. The only exceptions I will allow myself are the wiring which I will replace by thinner wires to add some realism, and the joint screws at the cowling exterior...
COMMENTS